I must confess that I was asking myself how hard it is to batch print sheets that have a specific parameter when I was pressing Ctrl + P a few years ago. And the question usually became grief when there were a huge number of sheets to issue. Oh, dear!
Practical case for batch print
Let’s see a practical case. Suppose you have to reissue some drawings with a new revision from a drawing set, so I can think of several options to achieve this:
- The first one is to print them all again, so you don’t have to be selective and choose one of the next points. Not efficient and it may take a long time for a big number of sheets.
- The second option is to create a new set of View/Sheet Set. This means selecting all the sheets that have this latest revision and update this list manually. Just what we want to avoid.
- The third option is to use pyRevit and create a schedule of sheets with the latest revision. Neat solution and little manual work, probably the best option if you don’t want to code.
- And the third option is to create the batch print script ourselves.
Well, beloved reader, you are right if you are expecting that we will go for the last solution. It will involve a bit of work to set it up, but I promise your ROI will be tenfold after two sets of Construction Drawings. Also, it will serve you well if you have to selectively print sheets with certain parameters.
Set up the batch print environment
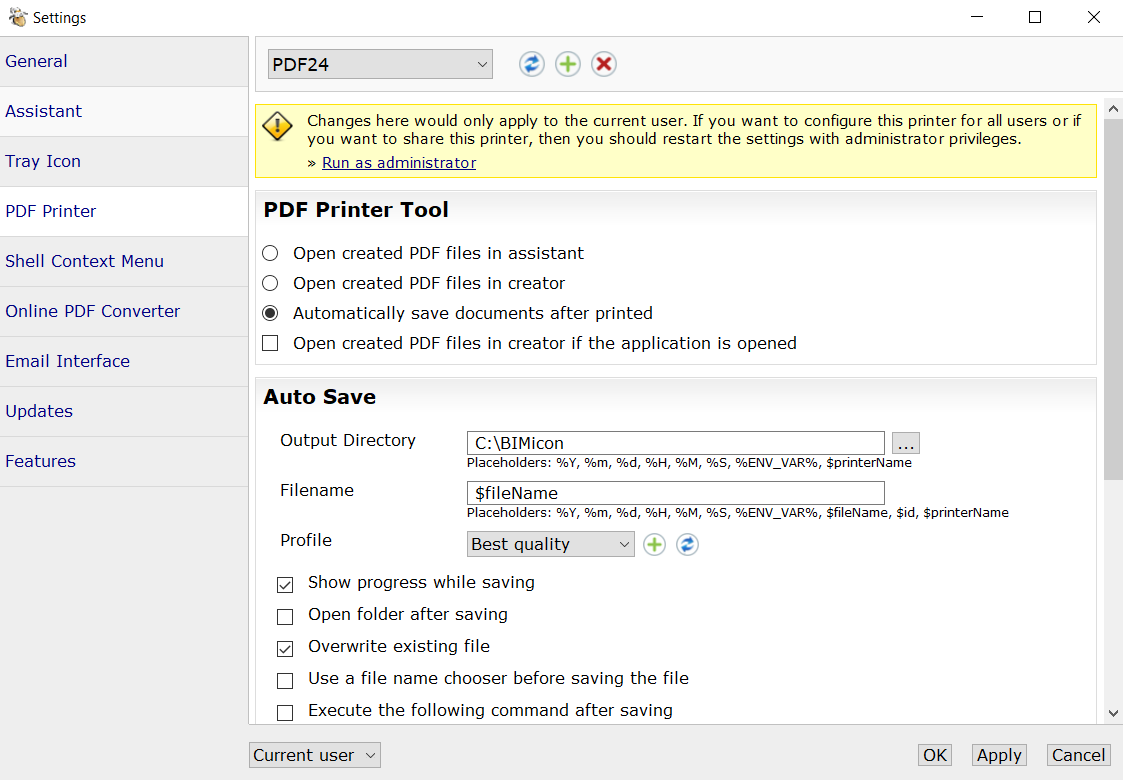
First things first, we need to choose and set up the PDF printer. Not every pdf printer has the setup we need, for example, CutePDF is not working with what we want to achieve, at least with the free version.
We have plenty of choices regarding which software to use, but I will recommend PDF24. The reason for this is simple: it is a freeware, you can deploy for free in your company or for personal use. No limitations. And it is faster than most pdf printers! And they have a kitsch website, right?
Although if your company has already paid for Acrobat licenses, fear not, there is no much difference in the setup. For PDF24, here is what you need to change inside Settings:
- Automatically save documents after printed (it will avoid you to click OK for every single pdf)
- Filename must be $fileName, so the printer will pick up the name we pass inside the script to it.
The rest of the options is up to you. For example, Output Directory is not necessary to set it up as the script will allow you to choose a directory and I tick Show progress while saving because I like to see the progress and overwrite the existing files.
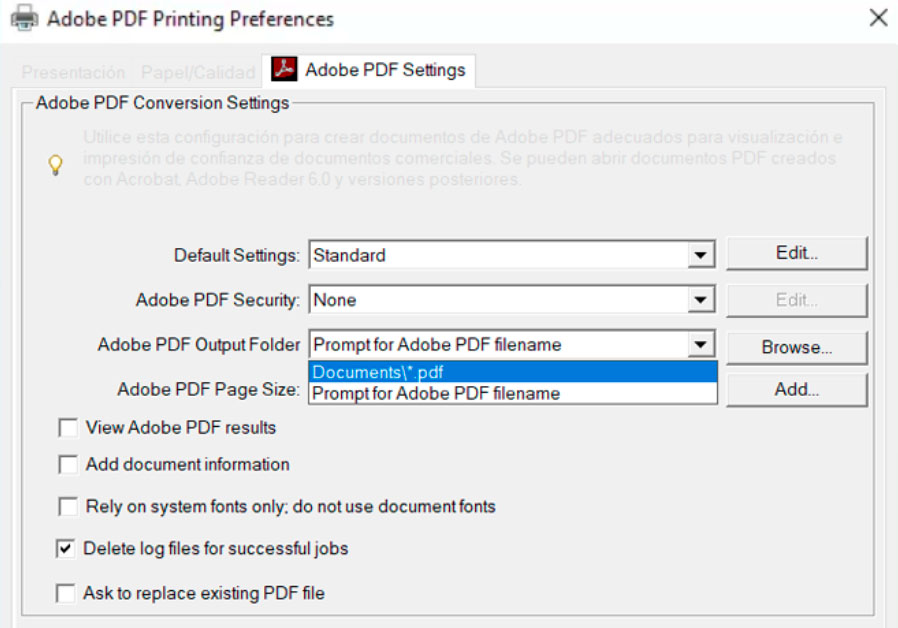
For Acrobat, these are the mandatory Settings:
- Adobe PDF Output Folder, select a folder to store the pdf, it will be an auxiliary folder. Do not leave as Prompt for Adobe PDF filename as it will open a dialog for each file name.
- Untick View Adobe PDF results, otherwise, you will have to close every pdf once it’s printed.
And this is all we have to do for the pdf printer settings.
Plan to get a batch print script
So we have covered how to set up the printer, now for the automation script. So before we jump into coding, here is the plan we are going to follow using pyRevit:
- Prompt for user input about required revision
- Retrieve all sheets that have the selected revision
- Use this set of sheets to feed the printer
- Prompt for user to select destination folder
- Print the sheets into the selected folder
Sounds good? Let’s proceed with it.
Batch print sheets with defined revision script
Here is the code that will make batch printing happen:
# -*- coding: utf-8 -*-
"""Print all sheets with a specified revision date.
NOTE:
Name of the files will be sheet number, name and appended revision.
Existing files will be overwritten."""
__title__ = 'Print by\nRev Date'
__author__ = "BIMicon"
# Import commom language runtime
import clr
# Import winreg to edit Registry
import _winreg
# Import Revit DB
from pyrevit import forms
from pyrevit import DB
# Import libraries to enable Windows forms
clr.AddReference('System.Windows.Forms')
clr.AddReference('System.Drawing')
from System.Drawing import Point, Size
from System.Windows.Forms import Application, Button, Form, Label, TextBox, FolderBrowserDialog, DialogResult
# Global values, predefined parameters
originalKeyValue = ""
keyValue = r"Software\PDFPrint\Services\PDF"
# Variable to store sheets with revisions
sheets = []
# Naming of pdf files
fileNames = []
# Print configuration
selectedPrinter = "PDF24"
pageConfig = "A3"
# Printed and failed sheets
printedSheets = []
failedSheets = []
# Store current document to variable
doc = __revit__.ActiveUIDocument.Document
uidoc = __revit__.ActiveUIDocument
# Create a class form
class CreateWindow(Form):
def __init__(self, title, author):
# Create the form
self.Name = "Create Window"
self.Text = title
self.Size = Size(500, 150)
self.CenterToScreen()
self.value = ""
# Create label for input title
labelDiv = Label(Text = author + ":")
labelDiv.Parent = self
labelDiv.Size = Size(250, 250)
labelDiv.Location = Point(30, 20)
# Create TextBox for input
self.textboxDiv = TextBox()
self.textboxDiv.Parent = self
self.textboxDiv.Text = "Date 1"
self.textboxDiv.Size = Size(150, 150)
self.textboxDiv.Location = Point(300, 20)
# Create button
button = Button()
button.Parent = self
button.Text = "Ok"
button.Location = Point(300, 60)
# Register event
button.Click += self.ButtonClicked
def ButtonClicked(self, sender, args):
if sender.Click:
# Handle non numeric cases
try:
self.value = self.textboxDiv.Text
self.Close()
except:
self.Close()
# Function to set the printing path in the registry
def changePrintPath(printPath):
try:
global originalKeyValue
key = _winreg.OpenKey(_winreg.HKEY_CURRENT_USER, keyValue, 0, _winreg.KEY_ALL_ACCESS)
originalKeyValue, regType = _winreg.QueryValueEx(key, "AutoSaveDir")
_winreg.SetValueEx(key, "AutoSaveDir", 0, _winreg.REG_SZ, printPath)
_winreg.CloseKey(key)
except:
pass
# Function to return the the registry to original state
def unmodifyRegistry(originalKeyValue):
try:
key = _winreg.OpenKey(_winreg.HKEY_CURRENT_USER, keyValue, 0, _winreg.KEY_ALL_ACCESS)
_winreg.SetValueEx(key, "AutoSaveDir", 0, _winreg.REG_SZ, originalKeyValue)
_winreg.CloseKey(key)
except:
pass
# Function to create Windows folder browser
def windBrowser():
# Create folder browser window
dialog = FolderBrowserDialog()
# Record for user action and store selected path
if (dialog.ShowDialog() == DialogResult.OK):
return dialog.SelectedPath
# Function to pick printSetting by Name
def pickPrintSetting(name):
for p in printSettingCollector:
if p.Name == name:
return p
# Function to print
def printSheet(sheets, printerName, combined, fileNames, printSettingName):
for sheet, filePath in zip(sheets, fileNames):
# Set print range
printManager = doc.PrintManager
printManager.PrintRange = printManager.PrintRange.Select
printManager.Apply()
# Define current view set as current
viewSet = DB.ViewSet()
viewSet.Insert(sheet)
viewSheetSetting = printManager.ViewSheetSetting
viewSheetSetting.CurrentViewSheetSet.Views = viewSet
viewSheetSetting.SaveAs("Current Print")
# Set printer
printManager.SelectNewPrintDriver(printerName)
printManager.Apply()
# Check if printer is virtual and set print to file
printManager.CombinedFile = combined
printManager.Apply()
if printManager.IsVirtual:
printManager.PrintToFile = True
else:
printManager.PrintToFile = False
printManager.Apply()
# Set destination filepath
printManager.PrintToFileName = filePath
printManager.Apply()
# Set print setting
printSetup = printManager.PrintSetup
printSetup.CurrentPrintSetting = pickPrintSetting(printSettingName)
printManager.Apply()
try:
# Submit to printer
printManager.SubmitPrint()
# Append sheet as successful
printedSheets.append(sheet.SheetNumber)
except:
# Append sheet as failed
failedSheets.append(filePath)
# Delete Current viewSheetSettings to allow new setting to be stored
viewSheetSetting.Delete()
# Function to display results to user
def printMessage(resultList, message, messageWarning):
if len(resultList) != 0:
print(message)
print("\n".join(resultList))
else:
print(messageWarning)
# Call windBrowser to select folder
printFolder = windBrowser()
# Call the CreateWindow class and create the input for Revision Date
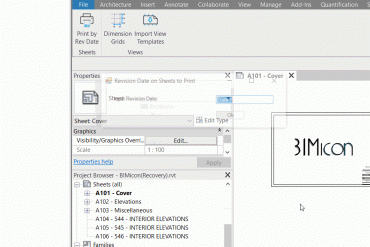
formRevision = CreateWindow("Revision Date on Sheets to Print", "Input Revision Date")
Application.Run(formRevision)
# Assign the input to variable
revDate = formRevision.value
# Collects all sheets in current document
sheetsCollector = DB.FilteredElementCollector(doc).OfCategory(DB.BuiltInCategory.OST_Sheets)
# Get curent revision on sheets and collect sheets
for s in sheetsCollector:
if s.GetCurrentRevision() != DB.ElementId.InvalidElementId and \
doc.GetElement(s.GetCurrentRevision()).RevisionDate == revDate:
rev = doc.GetElement(s.GetCurrentRevision())
sheets.append(s)
# Retrieve sheets number, name and revision
for s in sheets:
number = s.SheetNumber
name = s.Name
revision = s.GetRevisionNumberOnSheet(doc.GetElement(s.GetCurrentRevision()).Id)
pdfName = printFolder + "\\" + number + " - " + name + "[" + revision + "]" + ".pdf"
fileNames.append(pdfName)
# Collect all print settings from document
printSettingCollector = DB.FilteredElementCollector(doc).OfClass(DB.PrintSetting)
# Change path to save printed files
changePrintPath(printFolder)
# Create a individual transaction
t = DB.Transaction(doc, "Batch Print")
# Start transaction
t.Start()
printSheet(sheets, selectedPrinter, True, fileNames, pageConfig)
# Commit transaction
t.Commit()
# Print message
printMessage(printedSheets, "The following sheets have been printed:", "No file has been printed.")
# Return Registry to original path
unmodifyRegistry(originalKeyValue)
Some concise explanations here:
Lines 1-8: The first line declares encoding as utf. Not needed in Python 3, but we are running IronPython 2.7. This will save us some headaches reading path files. __title__ defines the name of the button and the rest of the lines are elements displayed when the mouse pointer is over the button in the ribbon.
Lines 10-41: Imports clr, different required libraries, and the Revit API. Later we declare global variables that are storing printer settings. Some elements to highlight here are:
- The Registry, we are going to modify a key in the Windows Registry to change the output folder, located in here (if you are using Adobe you will have to change the keyValue to something similar to r”Software\Adobe\Acrobat Distiller\PrinterJobControl\C:Windows\splwow64.exe” depending on your installation):
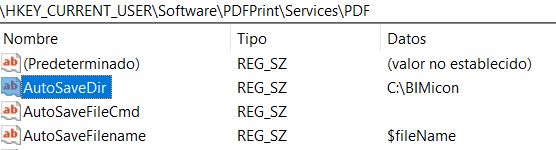
keyValue = r"Software\PDFPrint\Services\PDF"
- Hardcoded settings, please take into account that the printer and the paper format are hardcoded. This is for simplicity, and I will show you in the next posts on how to create WPF and use XAML to create all these inputs. So
selectedPrinter = "PDF24"
pageConfig = "A3"
Lines 43-83: Creates a Windows Form class to allow user input. .NET allows us to use Windows Forms and that’s great news! These lines are the mint that will allow us to create pop up dialogs.
Lines 85-103: Functions that will modify the Registry and set it back. The global keyword makes the variable originalKeyValue refer to the global one instead of keeping it local. Elements that you can further develop from this section are the except clauses, now only ignoring errors. But if an error happens in this section, files won’t print in the location selected, so better to stop the entire program.
Lines 105-111: Defines a function to call a Windows browser element, invokes it, and the Windows Form defined previously. Stores the user input into two variables.
Lines 119-166: Defines a print function that will be called to print the sheets inside a loop. This function is the core of the script and defines the logic of the program. Let’s check it in-depth:
Lines 121: In this loop, you can add extra settings like different page sizes. An idea to further develop is to retrieve the size of the title block and print each sheet with the proper paper size.
Lines 123-125: Define the PrintRange, set to Select allows us to input our own select views or sheets.
https://www.revitapidocs.com/2015/1f93dd2e-cf31-9990-cfa0-0100e523b843.htm
Lines 127-132: Cast an IEnumerable C# object to pass a ViewSet and set it as the views to print and save these views. If this configuration is not saved, Revit will throw an error.
https://www.revitapidocs.com/2015/e0e891ee-2ff1-9097-9faa-6e3c7db51e81.htm
Lines 134-136: Select a new printer for the job.
https://www.revitapidocs.com/2015/7de58a88-684b-5bc2-f433-63bed6170dac.htm
Lines 138-145: Fun fact, in order to specify single names for the pdf, we need to set combined as True. It doesn’t make much sense, but it is what we have to work with. PrintToFile must be True as well, as we are using a virtual printer.
Lines 147-149: Input a path and file name for the printed views.
Lines 151-154: Select a new printer for the job.
Lines 156-166: Send the views to print in a try statement, if it fails append the failed sheetNumber to list of failed sheets.
Lines 165-166: This is important, if the setting is not deleted, Revit won´t be able to save it again with the next view and throw an error.
Lines 186-194: Collects al sheets in the project and filter the ones with revision on it and matches the input date of the user.
Lines 196-202: Prepares a list with the final destination of the pdf.
Lines 204-205: Collects all print Settings from Revit. We will need this to select the right print settings in the script when calling the printManager class.
Lines 207-208: Change the output folder in the Registry.
Lines 210-217: Creates a transaction to initiate changes in Revit’s database and call the printing function. Commits the transaction to finish changes in Revit’s database.
Lines 219-220: Outputs the sheets printed or failed.
Lines 222-223: Change the output folder in the Registry back to default.
Conclusion
So, after you have copied or modified the script to your custom needs, follow the instructions in Create your own Revit tab in the ribbon to get the tool into the Revit ribbon.

And that’s all folks! 30 minutes set up for a lifetime hassle-free printing!
Here is the code, although you know I like people to type it, at least you will learn some syntax!
Leave a Reply